METATRON: The First Practical Glimpse of Local-AI Penetration Testing — And Why AI Governance Teams Should Care
An InfoSec, compliance, and AI governance perspective from DISC InfoSec
In our recent post “Why Run LLMs Locally? The Future of Private Enterprise AI”, we made the case that the next phase of enterprise AI maturity will be measured by control, not capability. Cloud LLMs gave us speed. Local LLMs give us sovereignty, auditability, and defensibility — the three things every InfoSec and compliance program is now being asked to prove.
We closed that post by flagging an emerging tool worth watching: METATRON.
This is the deeper look.
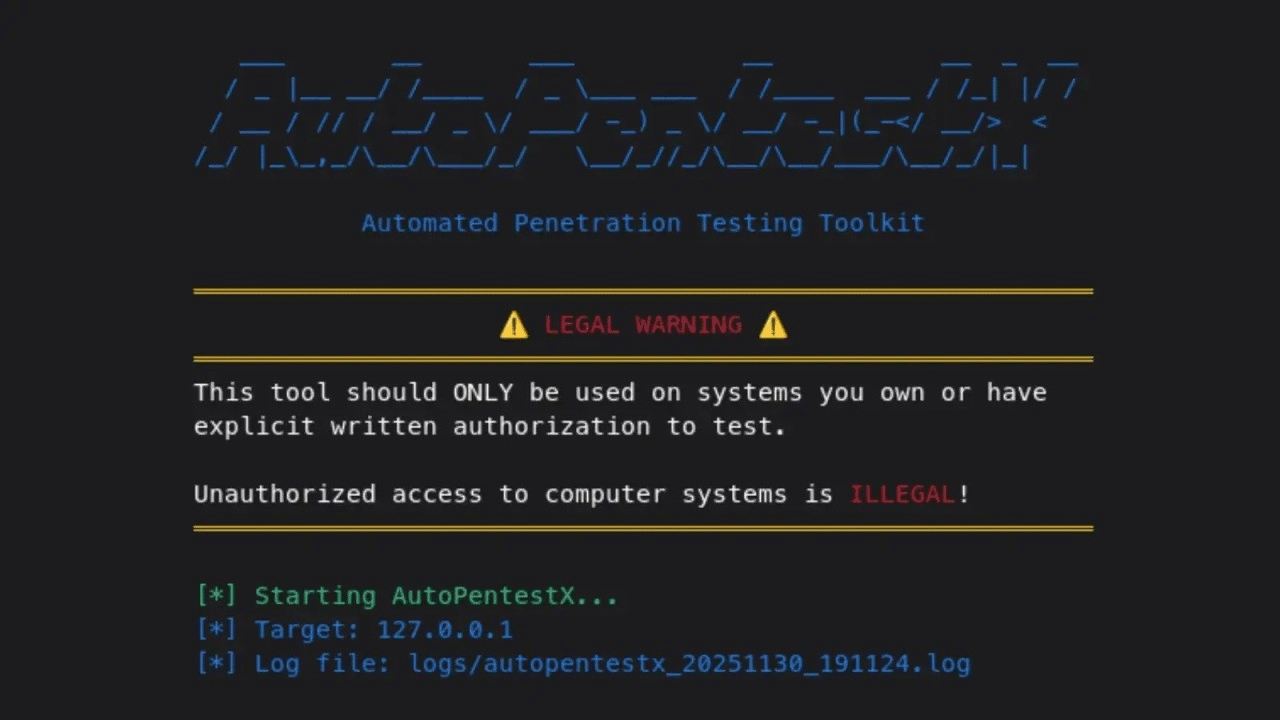
What Is METATRON?
METATRON is an open-source, CLI-based penetration testing assistant that runs entirely on the operator’s local machine — no cloud, no API keys, no third-party subscriptions, no data leaving the host.
You feed it a target IP or domain. It autonomously orchestrates a stack of standard reconnaissance tools (nmap, nikto, whois, dig, whatweb, curl), pipes the raw output into a locally hosted, fine-tuned LLM, and the model performs the analysis — identifying services, flagging probable vulnerabilities, cross-referencing CVEs, and recommending fixes. Everything is persisted to a five-table MariaDB schema with full audit history and exportable PDF/HTML reports.
A few specifics worth pinning down:
- Language / runtime: Python 3, CLI
- AI model:
metatron-qwen, a fine-tuned variant ofhuihui_ai/qwen3.5-abliterated:9b - LLM runner: Ollama, running on-device
- Model parameters: 16,384-token context window, temperature 0.7, top-k 10, top-p 0.9 — tuned for technical precision, not creative output
- OS target: Parrot OS / Debian-based Linux
- Hardware floor: ~8.4 GB RAM for the 9B model (a 4B variant is available for lighter rigs)
- License: MIT
- Repo: github.com/sooryathejas/METATRON
The two architectural choices that matter most for an AI governance practitioner:
- An agentic loop. The model can autonomously request additional tool executions mid-analysis if it needs more data before rendering a verdict. This is genuine iterative reasoning, not a single-pass scan.
- A zero-exfiltration guarantee. Because inference runs locally through Ollama, target data — internal IP ranges, banner information, discovered vulnerabilities, exploit attempts — never leaves the tester’s machine.
That second point is the headline. We’ll come back to it.
How METATRON Strengthens AI Governance Controls
If you’re implementing an AIMS under ISO/IEC 42001, mapping to NIST AI RMF, or preparing for the EU AI Act, here’s where METATRON’s architecture maps onto real control requirements rather than slideware.
1. Data sovereignty becomes a default, not a policy fiction
Most AI tools force a difficult conversation with your DPO or compliance lead: “What happens to the data we feed the model?” With cloud-AI pentest assistants, your answer typically involves vendor TOS, retention windows, and cross-border data transfer clauses you may or may not have negotiated.
With METATRON, the answer is structurally simple: nothing leaves the host. That single architectural property satisfies:
- ISO 27001:2022 A.5.14 (Information transfer) — no external transfer occurs
- ISO 42001 Annex A controls on data handling and third-party AI services — the AI provider is you
- GDPR Article 28 / SCCs — there is no processor to assess; cross-border transfer is moot
- Internal data residency commitments to enterprise customers — the assertion becomes verifiable, not aspirational
This is the same architectural principle we lean on when advising regulated clients. Financial data rooms are the “hard mode” of compliance — if it works there, it works anywhere — and the same logic applies to security tooling.
2. Auditability is built in, not bolted on
The five-table MariaDB schema (history, vulnerabilities, fixes, exploits_attempted, summary) keyed by session number isn’t just engineering tidiness. It’s an audit trail.
For AI governance, this matters because regulators and auditors are increasingly asking the same questions of AI-assisted security work that they ask of AI-assisted business work:
- Who ran the AI?
- Against what target?
- What did the model output?
- What action was taken on that output?
- Can you reproduce the analysis?
METATRON answers all five by design. That maps cleanly to ISO 42001 Clause 8 (Operation) and Clause 9 (Performance evaluation), and to the NIST AI RMF MEASURE function — specifically the obligation to log, retain, and review AI system outputs.
Exportable PDF/HTML reports give you something to attach to a finding, a client deliverable, or an audit working paper.
3. Third-party AI risk drops to near-zero for this workflow
The fastest-growing category of Shadow AI in security teams is not ChatGPT — it’s pentesters and SOC analysts pasting sensitive data into cloud LLMs to accelerate analysis. We’ve seen it in vendor assessments. We’ve seen it in internal audit walkthroughs. It is everywhere.
METATRON removes the temptation. The local model is good enough to be useful, the workflow is purpose-built, and there’s no cloud endpoint to send anything to. For a CISO trying to enforce an Acceptable Use of AI Tools policy under ISO 42001 Annex A.3, that’s a structural win, not a training problem.
4. It pressure-tests AI-deployed environments using AI-native tooling
This is the meta-point. If your organization is shipping AI features, your attack surface now includes prompts, embeddings, vector stores, model endpoints, and orchestration plumbing — none of which traditional pentest workflows fully cover.
METATRON’s agentic loop is, in effect, a small example of the architecture you’re trying to defend. Operating it gives security teams direct, hands-on exposure to:
- Local model serving (Ollama)
- Context-window management
- Agentic tool dispatch and prompt routing
- LLM output validation against structured tooling
That’s not a curriculum. That’s practice. And practice is what builds AI security maturity faster than any framework alone.
Why You Should Have It on Your Bench Today
A few honest reasons, not marketing reasons.
1. The AI pentesting tooling landscape is consolidating fast. METATRON, Apex, pentest-ai-agents, CVE MCP Server — within a single quarter we’ve seen multiple credible entrants. Getting hands on the open-source ones now is how you stay literate before clients and auditors start asking which you use.
2. Auditors are starting to ask AI-specific testing questions. “Have you tested your AI system’s attack surface?” is a question on more audit checklists every quarter. Saying “yes, with a tool that runs entirely on-prem and produces a defensible audit trail” is materially stronger than “yes, we used a cloud service.”
3. The Shadow AI problem inside security teams is real. If your pentesters and analysts are already using cloud LLMs to speed up analysis, you have a data-exfiltration risk you may not be tracking. A local alternative gives you something to migrate them to.
4. The cost is your time, not your budget. MIT-licensed, free, no subscription. The only meaningful cost is the GPU/RAM to run the model. If you’re already running local LLM experiments — and you should be — the marginal cost is roughly zero.
5. It’s a teaching environment. For internal training on local AI, prompt engineering for technical workflows, and agentic orchestration, METATRON is one of the more concrete sandboxes available right now.
How to Install METATRON
Below is the consolidated install path, distilled from the project’s README. Run it on Parrot OS or another Debian-based distribution. Plan for around 8.4 GB of free RAM for the 9B model (use the 4B variant on lighter hardware).
⚠️ Legal note up front: This is offensive security tooling. Only run it against systems you own or have explicit written authorization to test. Unauthorized scanning is illegal.
Step 1 — Clone the repository
git clone https://github.com/sooryathejas/METATRON.git
cd METATRON
Step 2 — Set up the Python environment
python3 -m venv venv
source venv/bin/activate
pip install -r requirements.txt
Step 3 — Install the recon tooling
sudo apt install nmap whois whatweb curl dnsutils nikto
Step 4 — Install Ollama (the local LLM runner)
curl -fsSL https://ollama.com/install.sh | sh
Step 5 — Pull the base model
ollama pull huihui_ai/qwen3.5-abliterated:9b
If you’re RAM-constrained, pull the 4B variant instead and update the Modelfile:
ollama pull huihui_ai/qwen3.5-abliterated:4b
Step 6 — Build the custom metatron-qwen model
ollama create metatron-qwen -f Modelfile
ollama list   # verify metatron-qwen appears
Step 7 — Stand up MariaDB
sudo systemctl start mariadb
sudo systemctl enable mariadb

mysql -u root
Then in the MariaDB shell:
CREATE DATABASE metatron;
CREATE USER 'metatron'@'localhost' IDENTIFIED BY '123';
GRANT ALL PRIVILEGES ON metatron.* TO 'metatron'@'localhost';
FLUSH PRIVILEGES;
EXIT;
🔐 Hardening note: The default credentials in the README (
metatron / 123) are fine for a lab. Do not ship them. Rotate immediately, store the new password in a vault, and restrict the MariaDB bind address to localhost.
Then create the five tables exactly as defined in the project’s README (history, vulnerabilities, fixes, exploits_attempted, summary). The schema is short and worth pasting verbatim from the source — see the GitHub repo for the canonical DDL.
Step 8 — Run it
You need two terminals.
Terminal 1 — load the model:
ollama run metatron-qwen
Wait for the >>> prompt. Leave it running.
Terminal 2 — launch METATRON:
cd ~/METATRON
source venv/bin/activate
python metatron.py
From the main menu, pick [1] New Scan, enter a target you’re authorized to test, and choose the recon tools to run. METATRON handles the rest — orchestration, LLM analysis, CVE lookups, persistence, and report generation.
My Perspective
A few practitioner-grade observations to close.
This is an early tool, not a managed product. With 44 stars on GitHub and four commits at the time of writing, METATRON is a research-grade project from a single author. That’s a feature, not a bug — it’s the right time to evaluate it, understand the architecture, and decide whether to fork, contribute, or wait. But don’t put it on a production engagement until you’ve vetted the codebase yourself.
The local LLM is the real innovation here, not the recon stack. nmap and nikto orchestration has existed for two decades. What’s new is the deterministic privacy posture of the analysis layer. That’s the part worth studying, because the same architectural pattern — local model + structured tool dispatch + persistent audit trail — is what AI governance teams are going to want for every sensitive AI workflow, not just pentesting.
Treat the AI output as a first opinion, not a verdict. The model is fine-tuned for technical analysis, but it’s still a 9B-parameter model running on a laptop. Cross-reference CVE findings, validate exploit suggestions, and remember that the temperature 0.7 setting means the output isn’t deterministic. For ISO 42001 conformance, this is exactly the kind of human-in-the-loop control you’d document under A.6.2.6 (Human oversight) and A.9.3 (Use of AI systems).
The hard problems METATRON doesn’t solve are also worth naming. It doesn’t address prompt injection of the LLM itself, doesn’t sandbox the recon tools, doesn’t enforce scope boundaries against unauthorized targets, and doesn’t include a safety layer to prevent operator misuse. Each of those is something a mature program should layer around the tool, not assume the tool provides.
Where this fits in a real practice. For DISC InfoSec’s clients — and frankly for any organization implementing ISO 42001 — METATRON is most valuable as a demonstration platform: a hands-on way to show executives, auditors, and engineering teams what “AI inside the security perimeter” actually looks like. It is much easier to govern something you have touched than something you have only read about.
The organizations that learn to operate local AI tooling now — under their own roof, on their own hardware, against their own audit trail — are the ones that will pass the AI governance audits of 2027 without breaking a sweat.
METATRON is one place to start.
Need help building an AI governance program that holds up to a real Stage 2 audit? DISC InfoSec is an active ISO/IEC 42001 implementer and PECB Authorized Training Partner. email: info@deurainfosec.com.
Related reading from DISC InfoSec:
- Why Run LLMs Locally? The Future of Private Enterprise AI
- AI Governance and Cybersecurity: Designing for the Inevitable Attack
- AI Model Risk Management Is Becoming the Foundation of Enterprise AI Governance
The AI Governance Quick-Start: Defensible in 10 Days, Not 4 Quarters
DISC InfoSec is an active ISO 42001 implementer and PECB Authorized Training Partner specializing in AI governance for B2B SaaS and financial services organizations.
AI Vulnerability Scorecard: Discover Your AI Attack Surface Before Attackers Do
Your Shadow AI Problem Has a Name-And Now It Has a Score
Most AI Security Tools Won’t Pass an Audit. Here’s a 15-Minute Way to Find Out.

InfoSec services | InfoSec books | Follow our blog | DISC llc is listed on The vCISO Directory | ISO 27k Chat bot | Comprehensive vCISO Services | ISMS Services | AIMS Services | Security Risk Assessment Services | Mergers and Acquisition Security
- The adversary that treats your balance sheet as the objective
- Why Supplier Security Is Under the Spotlight — and How to Build a Vendor Management Program for the AI Era
- GDPR Isn’t a Cookie Banner: The Audit Findings That Actually Get Companies Fined
- ATT&CK vs. ATLAS: Why Securing AI Systems Needs Its Own Playbook
- 20 State Laws, One Enforcement Standard: Privacy by Design or Pay